
Bring in scenes
Scaffold a new book, create scenes one at a time, or connect a vault you already have.
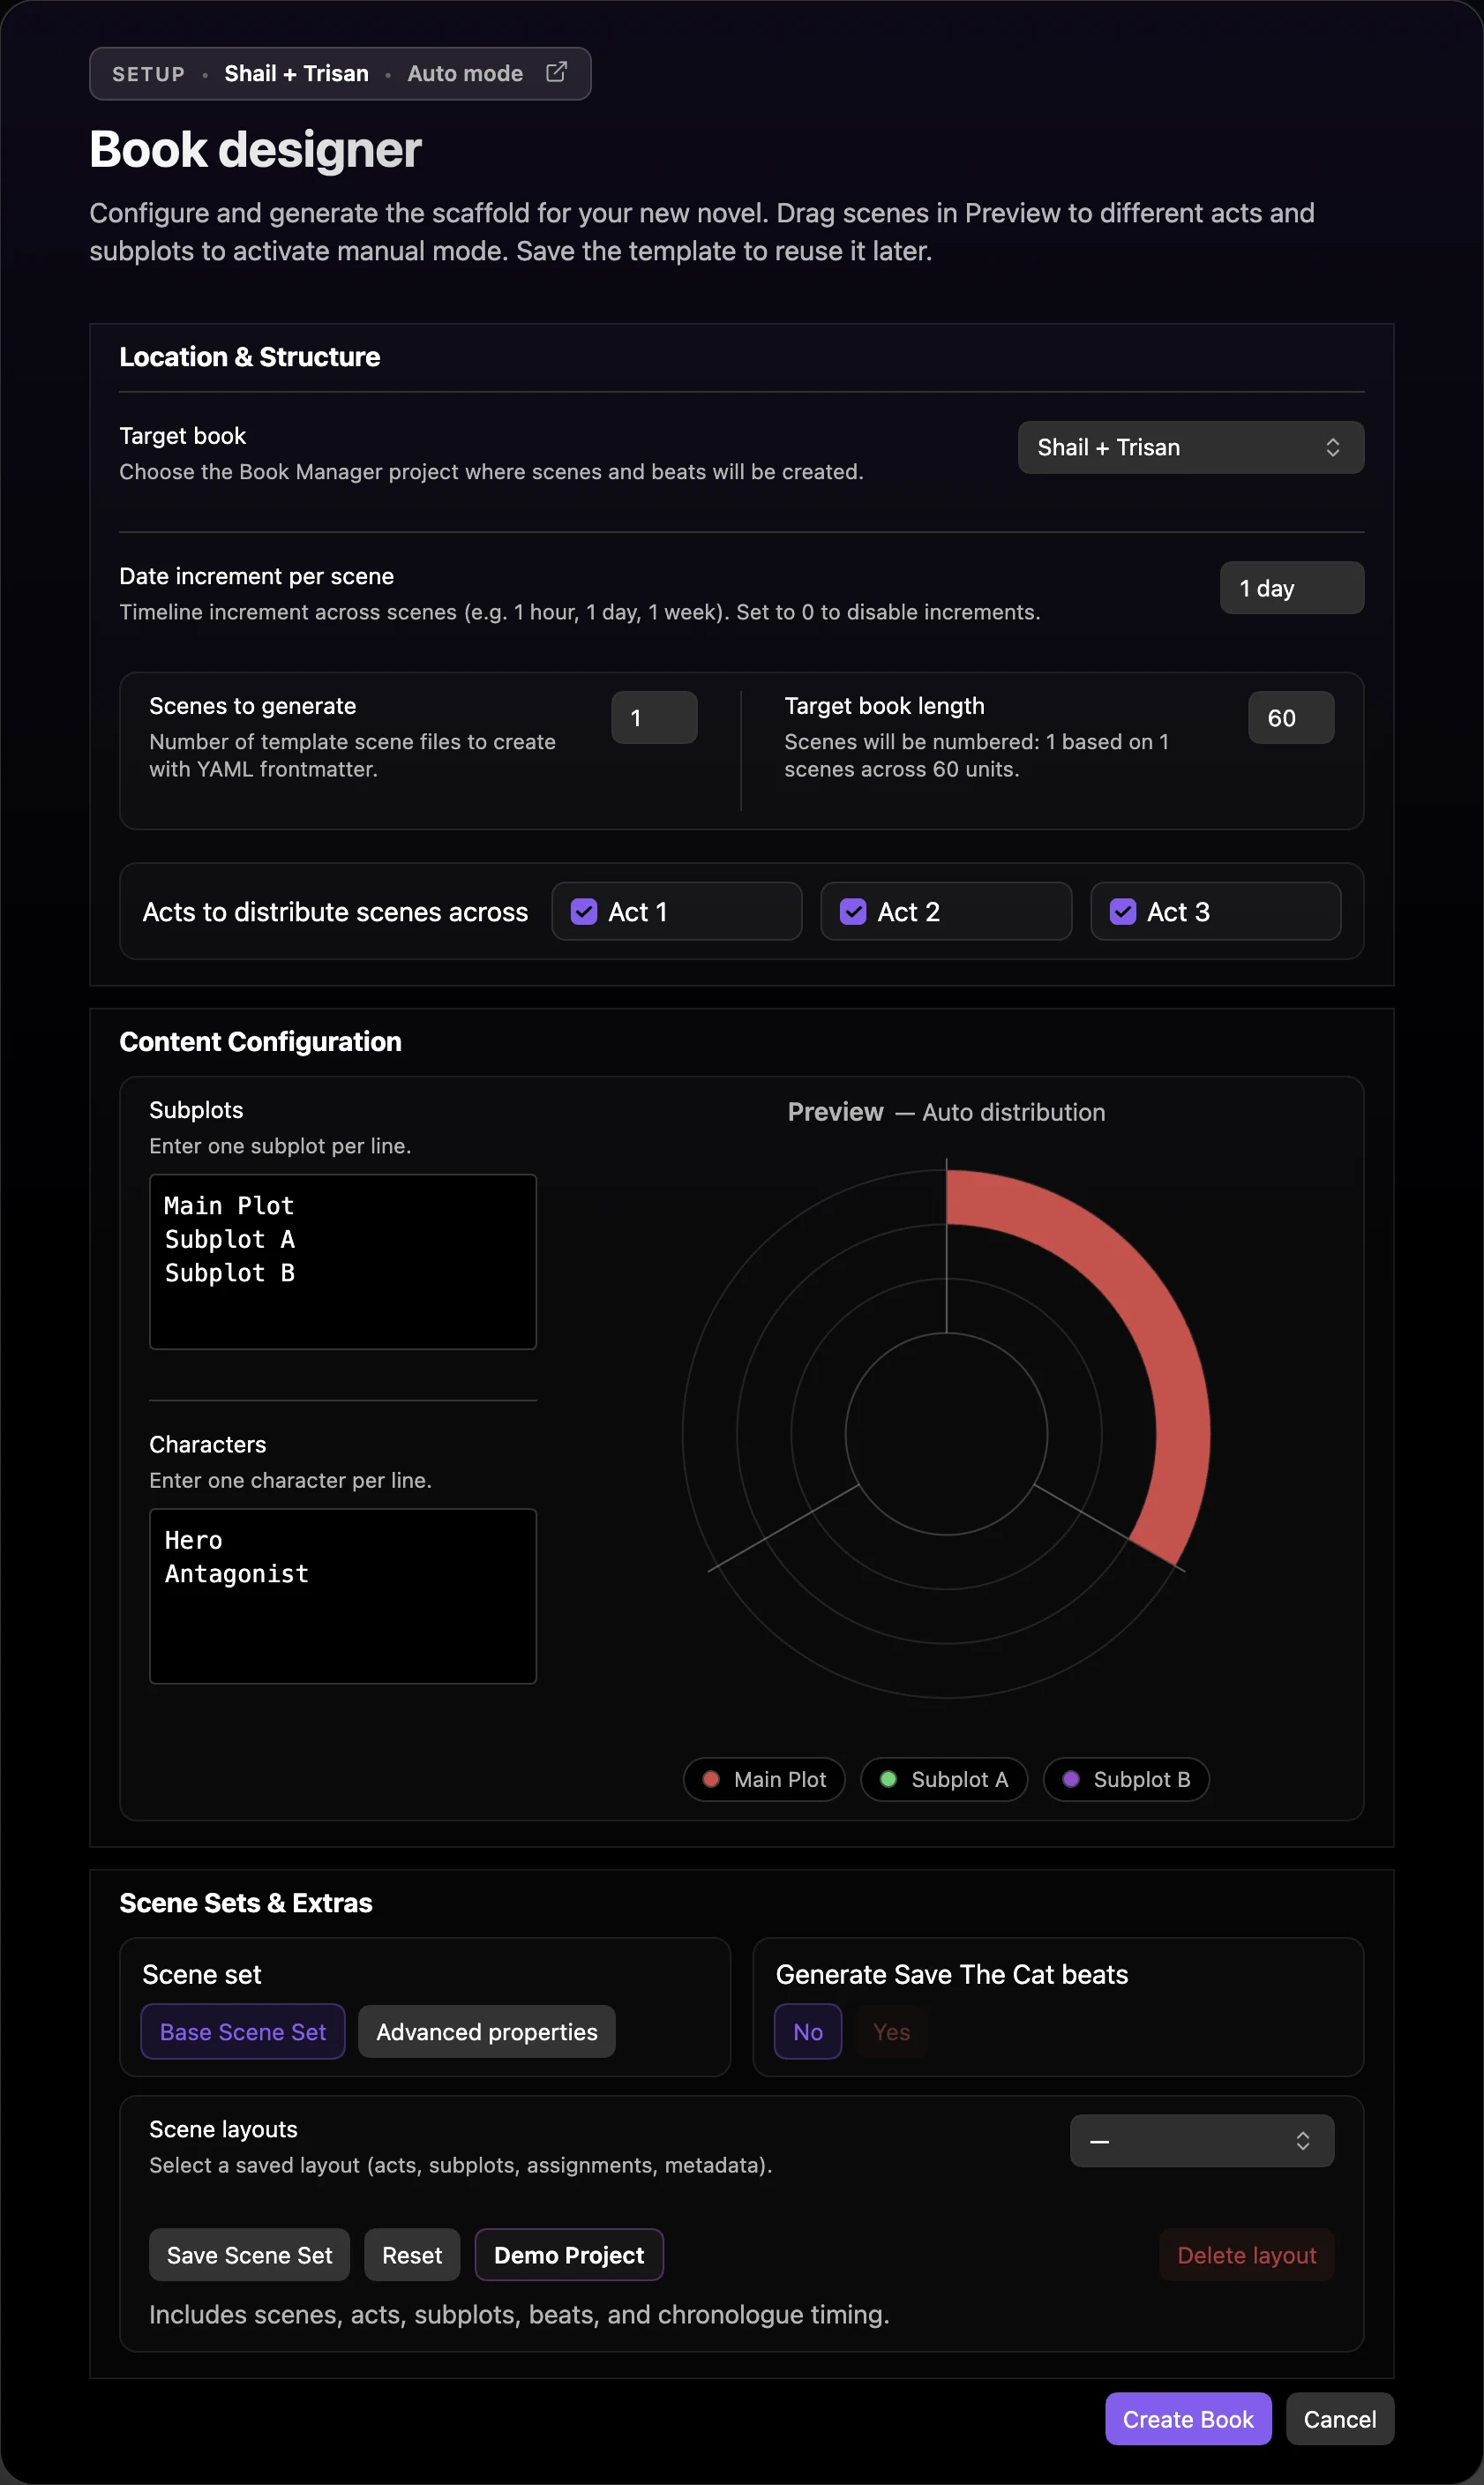
Scaffold acts, subplots, and optional beats.
Start from a fresh vault
Run Radial Timeline: Book designer to generate a scaffold of acts, subplots, and optional beats.
Set the time increment between each scene.
Adjust acts in settings (3 and above) then check the ones you need in the designer.
Don’t miss the auto or custom preview controls allowing manual drag.
Set scene properties for basic or advanced.
Enable your chosen beat system in Settings → Core.
Optionally save a preset.
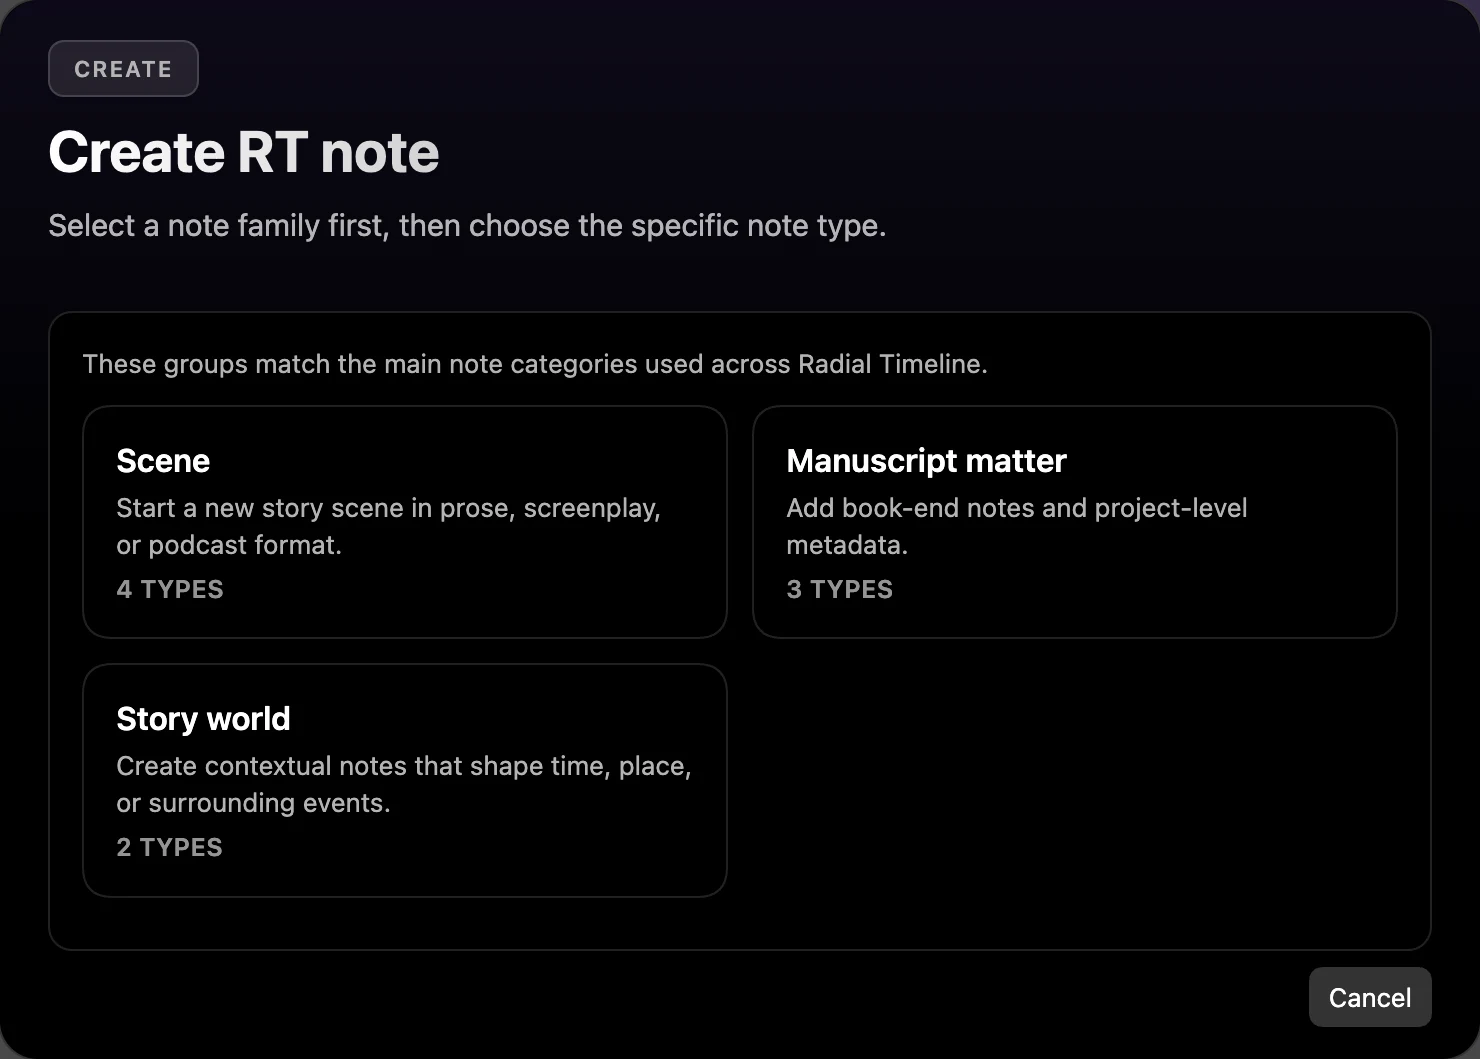
Create note → Scene for a single scene.
Create note
Or use Obsidian COMMAND PALETTE: Radial Timeline → Create note → Scene → Basic scene to add a single scene.
Right-click a scene to create a new one with consistent properties — including its When date, Subplot, and Order sequence.
Connect an existing vault
Make sure your scene notes use Class: Scene.
The main frontmatter properties are Synopsis, Summary, Subplot, When and Duration, Act, Status, Publish Stage and Due
Existing vaults must use Class: Scene — Radial Timeline only reads notes whose Class property is Scene.
Using different frontmatter keys? Enable Remap frontmatter field keys in Settings → Advanced → Configuration.
Keep reading on the wiki
UPDATED June 28, 2026
 scale(1 1) translate(-1.5340157047322094, -1.9665903890160183)" id="IegjeSHzG-2397143896-radial-gradient" r="0.9413204412956934"><stop offset="0" stop-color="rgba(255, 255, 255, 0.4)"/><stop offset="1" stop-color="rgba(0, 0, 0, 0.1)"/></radialGradient><radialGradient cx="2.0795513727963195" cy="1.0720170888007325" gradient-transform="translate(2.0795513727963195, 1.0720170888007325) scale(1 1) translate(-2.0795513727963195, -1.0720170888007325)" id="eOCpGoBza-2397143896-radial-gradient" r="0.9783605410971328"><stop offset="0" stop-color="rgba(255, 255, 255, 0.6)"/><stop offset="1" stop-color="rgba(255, 255, 255, 0.1)"/></radialGradient><radialGradient cx="1.274370632380699" cy="1.1459913693590935" gradient-transform="translate(1.274370632380699, 1.1459913693590935) scale(1 1) translate(-1.274370632380699, -1.1459913693590935)" id="Ilwag_X2s-2397143896-radial-gradient" r="1.079078401579728"><stop offset="0" stop-color="rgba(255, 255, 255, 0.8)"/><stop offset="1" stop-color="rgba(255, 255, 255, 0.4)"/></radialGradient><radialGradient cx="1.665284974093264" cy="2.7632925123409526" gradient-transform="translate(1.665284974093264, 2.7632925123409526) scale(1 1) translate(-1.665284974093264, -2.7632925123409526)" id="skeRhPuds-2397143896-radial-gradient" r="0.8912764607242154"><stop offset="0" stop-color="rgba(255, 255, 255, 0.3)"/><stop offset="1" stop-color="rgba(0, 0, 0, 0.3)"/></radialGradient><radialGradient cx="7.108478828990519" cy="0.6866697205680257" gradient-transform="translate(7.108478828990519, 0.6866697205680257) scale(1 1) translate(-7.108478828990519, -0.6866697205680257)" id="HceAY2pYM-2397143896-radial-gradient" r="0.9263407742294617"><stop offset="0" stop-color="rgba(255, 255, 255, 0)"/><stop offset="1" stop-color="rgba(255, 255, 255, 0.2)"/></radialGradient><radialGradient cx="2.0628742514970058" cy="2.76319018404908" gradient-transform="translate(2.0628742514970058, 2.76319018404908) scale(1 1) translate(-2.0628742514970058, -2.76319018404908)" id="Aa8504gdF-2397143896-radial-gradient" r="1.40144095157963"><stop offset="0" stop-color="rgba(255, 255, 255, 0.2)"/><stop offset="1" stop-color="rgba(255, 255, 255, 0.4)"/></radialGradient><radialGradient cx="7.095017571148285" cy="2.0782080485952923" gradient-transform="translate(7.095017571148285, 2.0782080485952923) scale(1 1) translate(-7.095017571148285, -2.0782080485952923)" id="JfFFj9hLH-2397143896-radial-gradient" r="1.112640862095963"><stop offset="0" stop-color="rgba(255, 255, 255, 0.1)"/><stop offset="1" stop-color="rgba(255, 255, 255, 0.3)"/></radialGradient><radialGradient cx="2.218009478672986" cy="4.14121082090842" gradient-transform="translate(2.218009478672986, 4.14121082090842) scale(1 1) translate(-2.218009478672986, -4.14121082090842)" id="HBMi_00xq-2397143896-radial-gradient" r="1.3482872456042416"><stop offset="0" stop-color="rgba(255, 255, 255, 0.2)"/><stop offset="1" stop-color="rgba(255, 255, 255, 0.3)"/></radialGradient></defs><g d="M 20.409 29.985 C 20.209 31.437 18.775 32.575 17.34 32.178 C 15.307 31.628 12.952 30.757 10.835 30.597 L 7.583 30.352 C 7.06 30.315 6.569 30.09 6.202 29.718 L 0.602 24.003 C -0.007 23.38 -0.171 22.45 0.188 21.657 C 0.188 21.657 3.64 14.124 3.778 13.734 C 3.901 13.345 4.376 9.922 4.652 8.088 C 4.73 7.601 4.974 7.156 5.343 6.827 L 11.955 0.929 C 12.395 0.535 12.979 0.34 13.569 0.389 C 14.158 0.439 14.701 0.728 15.07 1.189 L 20.639 8.187 C 20.95 8.587 21.118 9.079 21.114 9.585 C 21.114 10.907 21.229 13.635 21.974 15.392 C 22.712 16.973 23.628 18.464 24.704 19.839 C 24.971 20.184 25.001 20.655 24.781 21.031 C 24.298 21.848 23.331 23.422 21.974 25.432 C 21.114 26.813 20.577 28.369 20.401 29.985 Z M 20.474 29.73 C 20.275 31.189 18.84 32.328 17.406 31.938 C 15.381 31.38 13.033 30.509 10.908 30.349 L 7.664 30.104 C 7.14 30.066 6.648 29.838 6.283 29.463 L 0.683 23.732 C 0.068 23.103 -0.096 22.163 0.269 21.364 C 0.269 21.364 3.728 13.8 3.859 13.402 C 3.989 13.013 4.457 9.582 4.733 7.733 C 4.809 7.244 5.053 6.795 5.424 6.465 L 12.036 0.544 C 12.477 0.151 13.062 -0.043 13.651 0.008 C 14.241 0.059 14.783 0.349 15.15 0.811 L 20.712 7.84 C 21.023 8.24 21.19 8.733 21.188 9.238 C 21.188 10.568 21.303 13.303 22.039 15.068 C 22.777 16.656 23.693 18.155 24.77 19.538 C 25.042 19.882 25.076 20.358 24.854 20.737 C 24.363 21.562 23.404 23.136 22.039 25.161 C 21.183 26.549 20.648 28.11 20.474 29.73 Z M 6.879 29.912 C 9.479 24.663 9.41 20.896 8.298 18.222 C 7.285 15.747 5.39 14.188 3.902 13.218 C 3.872 13.363 3.826 13.501 3.764 13.63 L 0.266 21.385 C -0.097 22.186 0.071 23.126 0.688 23.754 L 6.28 29.484 C 6.457 29.66 6.664 29.805 6.879 29.912 Z M 13.94 19.269 C 14.638 19.338 15.321 19.491 15.996 19.735 C 18.129 20.53 20.069 22.318 21.673 25.763 C 21.788 25.565 21.903 25.374 22.025 25.19 C 23.005 23.742 23.944 22.267 24.841 20.767 C 25.064 20.389 25.034 19.913 24.764 19.567 C 23.684 18.185 22.766 16.686 22.025 15.097 C 21.289 13.34 21.182 10.597 21.174 9.268 C 21.174 8.764 21.013 8.267 20.698 7.87 L 15.137 0.84 L 15.045 0.726 C 15.451 2.063 15.428 3.133 15.175 4.103 C 14.945 5.004 14.515 5.822 14.063 6.685 C 13.909 6.976 13.756 7.274 13.61 7.579 C 12.889 8.952 12.475 10.464 12.398 12.011 C 12.322 13.86 12.697 16.175 13.932 19.269 Z M 13.954 19.243 C 12.719 16.148 12.343 13.833 12.419 11.984 C 12.496 10.151 13.033 8.775 13.631 7.553 L 14.092 6.659 C 14.537 5.796 14.959 4.978 15.196 4.076 C 15.479 2.962 15.433 1.789 15.066 0.699 C 14.272 -0.17 12.922 -0.238 12.044 0.547 L 5.431 6.468 C 5.06 6.798 4.816 7.247 4.741 7.736 L 3.935 13.054 C 3.935 13.107 3.92 13.153 3.912 13.207 C 5.4 14.169 7.287 15.728 8.308 18.196 C 8.507 18.685 8.676 19.197 8.799 19.755 C 10.475 19.292 12.218 19.116 13.954 19.235 Z M 17.429 31.935 C 18.855 32.325 20.29 31.186 20.489 29.719 C 20.653 28.328 21.066 26.977 21.709 25.731 C 20.098 22.285 18.157 20.497 16.032 19.703 C 13.77 18.862 11.307 19.145 8.806 19.749 C 9.366 22.278 9.036 25.586 6.904 29.888 C 7.142 30.01 7.41 30.079 7.679 30.101 L 11.046 30.354 C 12.872 30.483 15.595 31.423 17.429 31.935 Z M 12.412 11.881 C 12.327 13.715 12.557 15.808 13.792 18.895 L 13.409 18.857 C 12.297 15.64 12.051 13.99 12.135 12.133 C 12.212 10.276 12.818 8.848 13.417 7.625 C 13.57 7.32 13.923 6.746 14.076 6.456 C 14.521 5.593 14.82 5.142 15.073 4.355 C 15.442 3.255 15.365 2.735 15.319 2.216 C 15.603 4.088 14.521 5.715 13.708 7.373 C 12.955 8.766 12.511 10.303 12.404 11.881 Z M 8.661 18.337 C 8.814 18.673 8.944 18.948 9.036 19.368 L 8.707 19.445 C 8.576 18.956 8.476 18.604 8.285 18.184 C 7.165 15.563 5.37 14.211 3.912 13.218 C 5.677 14.165 7.495 15.655 8.661 18.337 Z M 9.052 19.72 C 9.666 22.585 8.975 26.229 6.942 29.775 C 8.645 26.26 9.474 22.891 8.783 19.766 L 9.052 19.712 Z M 16.071 19.434 C 19.408 20.679 20.696 23.407 21.655 25.691 C 20.466 23.308 18.817 20.672 15.948 19.694 C 13.77 18.945 11.928 19.037 8.776 19.747 L 8.707 19.441 C 12.051 18.677 13.8 18.586 16.071 19.441 Z" fill="transparent" height="32.25806451322377px" id="wS9Yt9mC8" transform="translate(8 4)" width="25px"><g d="M 20.409 29.603 C 20.209 31.055 18.775 32.193 17.34 31.796 C 15.307 31.246 12.952 30.375 10.835 30.215 L 7.583 29.97 C 7.06 29.933 6.569 29.708 6.202 29.336 L 0.602 23.621 C -0.007 22.998 -0.171 22.068 0.188 21.275 C 0.188 21.275 3.64 13.742 3.778 13.352 C 3.901 12.962 4.376 9.54 4.652 7.706 C 4.73 7.219 4.974 6.774 5.343 6.445 L 11.955 0.547 C 12.395 0.153 12.979 -0.042 13.569 0.007 C 14.158 0.057 14.701 0.346 15.07 0.807 L 20.639 7.805 C 20.95 8.205 21.118 8.697 21.114 9.203 C 21.114 10.525 21.229 13.253 21.974 15.01 C 22.712 16.591 23.628 18.082 24.704 19.457 C 24.971 19.802 25.001 20.273 24.781 20.649 C 24.298 21.466 23.331 23.04 21.974 25.05 C 21.114 26.431 20.577 27.987 20.401 29.603 Z" fill="transparent" height="31.87604442717374px" id="rTAPwkhlD" transform="translate(0 0.382)" width="24.92752476820854px"><path d="M 20.409 29.603 C 20.209 31.055 18.775 32.193 17.34 31.796 C 15.307 31.246 12.952 30.375 10.835 30.215 L 7.583 29.97 C 7.06 29.933 6.569 29.708 6.202 29.336 L 0.602 23.621 C -0.007 22.998 -0.171 22.068 0.188 21.275 C 0.188 21.275 3.64 13.742 3.778 13.352 C 3.901 12.962 4.376 9.54 4.652 7.706 C 4.73 7.219 4.974 6.774 5.343 6.445 L 11.955 0.547 C 12.395 0.153 12.979 -0.042 13.569 0.007 C 14.158 0.057 14.701 0.346 15.07 0.807 L 20.639 7.805 C 20.95 8.205 21.118 8.697 21.114 9.203 C 21.114 10.525 21.229 13.253 21.974 15.01 C 22.712 16.591 23.628 18.082 24.704 19.457 C 24.971 19.802 25.001 20.273 24.781 20.649 C 24.298 21.466 23.331 23.04 21.974 25.05 C 21.114 26.431 20.577 27.987 20.401 29.603 Z" fill="rgba(0, 0, 0, 0.3)" height="31.876044427596774px" id="j5FlW3Exx" transform="translate(0 0)" width="24.927524764089956px"/></g><path d="M 20.397 29.73 C 20.198 31.189 18.764 32.328 17.329 31.938 C 15.304 31.38 12.957 30.509 10.832 30.349 L 7.587 30.104 C 7.063 30.066 6.572 29.838 6.206 29.463 L 0.606 23.732 C -0.008 23.103 -0.173 22.163 0.192 21.364 C 0.192 21.364 3.652 13.8 3.782 13.402 C 3.912 13.013 4.38 9.582 4.656 7.733 C 4.732 7.244 4.976 6.795 5.347 6.465 L 11.959 0.544 C 12.401 0.151 12.985 -0.043 13.574 0.008 C 14.164 0.059 14.706 0.349 15.074 0.811 L 20.635 7.84 C 20.946 8.24 21.113 8.733 21.111 9.238 C 21.111 10.568 21.226 13.303 21.962 15.068 C 22.7 16.656 23.616 18.155 24.693 19.538 C 24.966 19.882 24.999 20.358 24.778 20.737 C 24.287 21.562 23.328 23.136 21.962 25.161 C 21.106 26.549 20.571 28.11 20.397 29.73 Z" fill="rgb(192, 192, 192)" height="32.01531072503584px" id="IAFPdfR7Q" transform="translate(0.077 0)" width="24.923289601408413px"/><path d="M 6.802 16.694 C 9.402 11.445 9.333 7.679 8.221 5.004 C 7.208 2.529 5.314 0.97 3.826 0 C 3.795 0.145 3.749 0.283 3.687 0.413 L 0.189 8.168 C -0.173 8.968 -0.006 9.909 0.611 10.536 L 6.204 16.266 C 6.38 16.442 6.587 16.587 6.802 16.694 Z" fill="url(%23IegjeSHzG-2397143896-radial-gradient)" height="16.694277895546293px" id="IegjeSHzG" transform="translate(0.077 13.218)" width="8.95111734959658px"/><path d="M 1.551 18.543 C 2.249 18.612 2.932 18.765 3.607 19.009 C 5.74 19.804 7.681 21.592 9.284 25.038 C 9.399 24.839 9.514 24.648 9.637 24.465 C 10.616 23.016 11.555 21.541 12.452 20.041 C 12.676 19.663 12.645 19.188 12.375 18.841 C 11.296 17.459 10.377 15.96 9.637 14.372 C 8.9 12.614 8.793 9.871 8.785 8.542 C 8.785 8.038 8.624 7.541 8.31 7.144 L 2.748 0.115 L 2.656 0 C 3.063 1.337 3.04 2.407 2.786 3.377 C 2.556 4.279 2.127 5.096 1.674 5.96 C 1.521 6.25 1.367 6.548 1.222 6.853 C 0.5 8.226 0.087 9.738 0.01 11.285 C -0.067 13.134 0.309 15.449 1.544 18.543 Z" fill="url(%23eOCpGoBza-2397143896-radial-gradient)" height="25.037596642428014px" id="eOCpGoBza" transform="translate(12.389 0.726)" width="12.600919411507695px"/><path d="M 10.041 19.243 C 8.806 16.148 8.43 13.833 8.507 11.984 C 8.584 10.151 9.121 8.775 9.719 7.553 L 10.179 6.659 C 10.624 5.796 11.046 4.978 11.284 4.076 C 11.567 2.962 11.521 1.789 11.154 0.699 C 10.359 -0.17 9.01 -0.238 8.131 0.547 L 1.519 6.468 C 1.148 6.798 0.904 7.247 0.828 7.736 L 0.023 13.054 C 0.023 13.107 0.008 13.153 0 13.207 C 1.488 14.169 3.375 15.728 4.396 18.196 C 4.595 18.685 4.764 19.197 4.886 19.755 C 6.563 19.292 8.306 19.116 10.041 19.235 Z" fill="url(%23Ilwag_X2s-2397143896-radial-gradient)" height="19.754520922152608px" id="Ilwag_X2s" transform="translate(3.912 0)" width="11.467090787761514px"/><path d="M 10.525 12.758 C 11.951 13.147 13.386 12.009 13.585 10.542 C 13.749 9.151 14.162 7.8 14.805 6.554 C 13.194 3.108 11.253 1.32 9.129 0.525 C 6.866 -0.315 4.403 -0.032 1.902 0.571 C 2.462 3.1 2.133 6.409 0 10.71 C 0.238 10.832 0.506 10.901 0.775 10.924 L 4.142 11.176 C 5.968 11.306 8.691 12.246 10.525 12.758 Z" fill="url(%23skeRhPuds-2397143896-radial-gradient)" height="12.834958629111679px" id="skeRhPuds" transform="translate(6.904 19.177)" width="14.805099640850074px"/><path d="M 0.291 9.665 C 0.207 11.499 0.437 13.592 1.672 16.679 L 1.289 16.641 C 0.176 13.424 -0.069 11.774 0.015 9.917 C 0.092 8.061 0.698 6.632 1.296 5.409 C 1.45 5.104 1.803 4.531 1.956 4.24 C 2.401 3.377 2.7 2.926 2.953 2.139 C 3.321 1.039 3.245 0.52 3.199 0 C 3.483 1.872 2.401 3.499 1.588 5.157 C 0.835 6.55 0.39 8.087 0.284 9.665 Z" fill="url(%23HceAY2pYM-2397143896-radial-gradient)" height="16.67899709198059px" id="HceAY2pYM" transform="translate(12.12 2.216)" width="3.244970697322204px"/><path d="M 4.748 5.119 C 4.902 5.455 5.032 5.73 5.124 6.151 L 4.794 6.227 C 4.664 5.738 4.564 5.386 4.372 4.966 C 3.253 2.346 1.457 0.993 0 0 C 1.764 0.947 3.582 2.437 4.748 5.119 Z" fill="url(%23Aa8504gdF-2397143896-radial-gradient)" height="6.226927453029873px" id="Aa8504gdF" transform="translate(3.912 13.218)" width="5.124252103672575px"/><path d="M 2.11 0.008 C 2.723 2.873 2.033 6.517 0 10.062 C 1.703 6.548 2.531 3.178 1.841 0.053 L 2.11 0 Z" fill="url(%23JfFFj9hLH-2397143896-radial-gradient)" height="10.062409148024926px" id="JfFFj9hLH" transform="translate(6.942 19.712)" width="2.325631818357707px"/><path d="M 7.364 0.6 C 10.701 1.846 11.99 4.573 12.949 6.858 C 11.76 4.474 10.11 1.838 7.241 0.86 C 5.063 0.111 3.222 0.203 0.069 0.914 L 0 0.608 C 3.345 -0.156 5.094 -0.248 7.364 0.608 Z" fill="url(%23HBMi_00xq-2397143896-radial-gradient)" height="6.857746358504947px" id="HBMi_00xq" transform="translate(8.707 18.834)" width="12.948708908681283px"/></g></svg>)